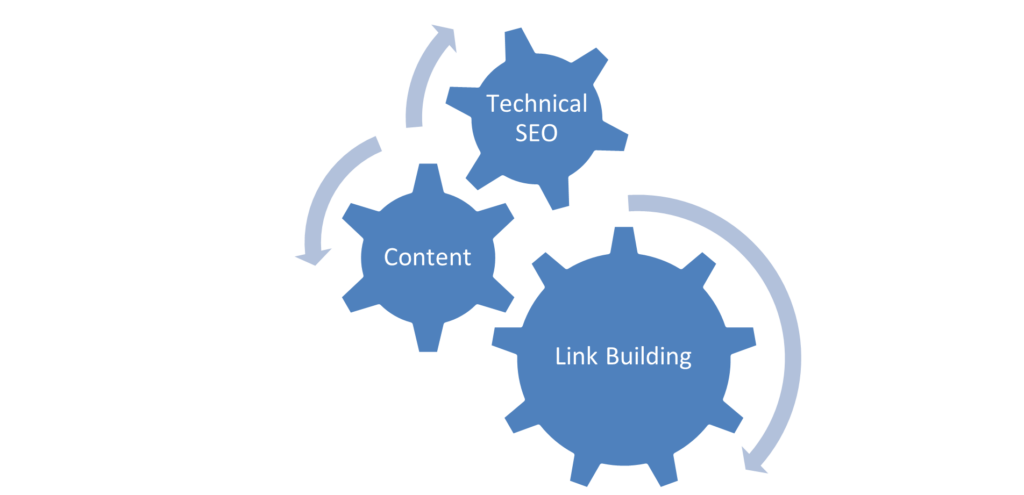
SEO, as a process, basically consists of 3 important parts; Technical SEO, Content and Link Building.
What is a Technical Audit?
A technical audit is a process to check the crucial technical aspects of your website. Understanding and maintaining your website by identifying these technical aspects can help you rank prominently, drive organic traffic, and help achieve your goals.
- Content Visibility
Since content plays a huge role in targeting our keywords and providing relevant information for our product offering, it is imperative to ensure that the content is visible and available to the user and the web crawlers. This makes it a good first step for a technical audit.
Ensure that the homepage, category pages, product pages, and all other high priority pages are visible to the user and available to the crawler.
Given below are a few methods to check if the content is readable to the crawlers
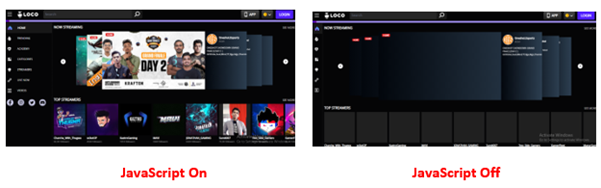
- Disabling JavaScript
JavaScript can be disabled in Chrome to see if any critical elements of the webpage are not rendered. Unrenderable content, links or navigation elements could indicate that the crawler cannot view the webpage present.
Since Google has stated that it can render JavaScript websites now, a few additional checks need to be performed to ensure that the website’s content is renderable.
- Cached version of the website
A cached version of the website
One way to check how the Googlebot views your page is to check the cached version. Checking the cached version of the webpage can help you identify if any essential content elements of the website are missing or not being rendered correctly.
Given below are methods to check the same
- Use the “site:” search operator in Google to find your page in the index (e.g., Site: example.com/abc)
- Click on the three dots next to the page’s URL and click on ‘Cached‘
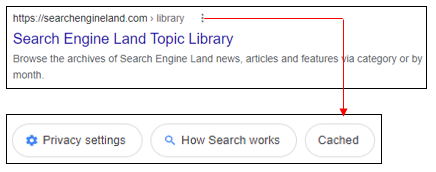
This will show you the cached version of Google’s page in their index from the last time it was crawled.
- The text-only version will help you understand if the content present in a webpage is rendered properly.
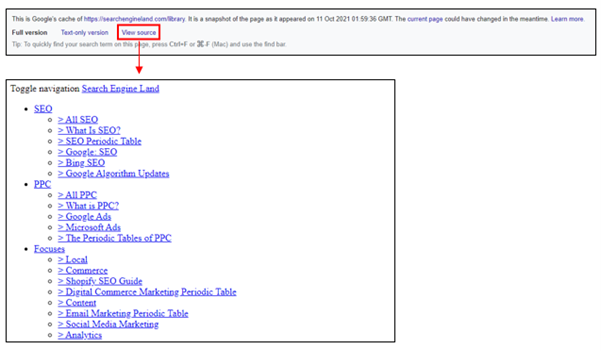
Alternatively, you can check the cached version of a specific page using the “cache:” operator (cache: example.com/example-url)
Content Rendering
To analyse if the content on the webpage is visible, we also need to understand how content is rendered. Rendering is the process where Googlebot retrieves your pages, runs your code, and assesses your content to understand the layout or structure of your site.
There are three different types of rendering for web pages that can be leveraged to present content to the user and bot
- Client-Side Rendering
- Server-Side Rendering
- Dynamic Rendering
The debate between client-side rendering, server-side rendering, or dynamic rendering is only relevant for websites that utilise JavaScript. If your website is purely HTML, there’s nothing that human users or search engine bots need to render.
Refer to the below-mentioned link for more information about Content Rendering
2. Indexation Checks
To rank for relevant terms, increase visibility, and improve organic traffic, one must ensure that all website’s important pages are indexed in Google.
Given below are a few checks that you must do to check indexation
- Google site: query
In the Google search field or browser Chrome search bar, you would type in the following:
site:www.abc.com
This, in turn, will give you a list of all the indexed pages of your website, thereby helping you understand any indexation issues if present.
The site: query can also be filtered using different options for specific indexation checks
site:www.abc.com/subdirectory/
Only displays the indexed pages in the directory /subdirectory/
site:www.abc.com Phrase of choice
Only displays those indexed pages which contain the phrase of your choice
site:www.abc.com inurl:phrase
Only displays those indexed pages which contain the word “phrase” in the URL
site:www.abc.com intitle:phrase
Only displays those indexed pages which contain the word “phrase” in the title
site:www.abc.com filetype:pdf
Only displays those indexed files with the chosen filetype
- Google Search Console
Google Search Console provides an overview of the indexed pages. Indexation can be checked by clicking on the option ‘Coverage’ under the ‘Index’ section.
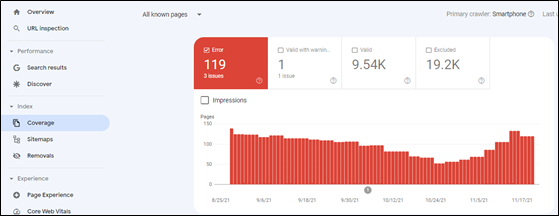
As seen from the above illustration, Google Search Console also provides valuable insights concerning indexed pages, including the presence of ‘no index’ tags, 404 pages, and server errors.
3. Duplicate Content Checks
Duplicate content confuses Google in choosing the identical pages that it should rank in the top results. This, in turn, harms website ranking, thereby leading to a drop in organic traffic in the process.
Given below are a few checks that you must do to prevent content duplication
- On-Page Elements
Make sure that all the pages have a unique page title and meta description in the HTML code of the pages. Also, headings (H1, H2, H3 etc.) should be unique for every page.
- Use of Proper Canonical URLs
The canonical tag is an integral part of letting Google know which site is original and should be ranked and which pages should not be ranked. If there are multiple similar pages, Google will be confused concerning ranking. As a result, it is vital to ensure that a proper canonical tag is defined pointing towards the master page.
- HTTP vs HTTPS or WWW vs non-WWW pages
If your site has separate versions for abc.com and www.abc.com (non- WWW and WWW versions of the website), Google will identify both the versions as duplicate content, thereby negatively affecting indexation and rankings. Similarly, different versions for HTTP and HTTPS can also create duplicate content issues. Proper 301 redirect (Permanent Redirect) should be employed to prevent duplication issues.
- Use of Hreflang tags
Hreflang tags are code snippets that tell search engines what language the content on a page of your site is written in, what geographical region it’s intended for and its relation to other pages of the website.
Example
<link rel=”alternate” hreflang=”en-in” href=”http://www.abc.com/in/” />
With respect to multilingual websites, it is highly imperative to implement hreflang tags correctly.
Refer to the below-mentioned link for more information on Hreflang Tags
4. Secure Protocols (HTTPS)
As per Google, HTTPS is a ranking signal. To capitalise on the same, one needs to ensure that non-secure versions (HTTP) are changed to HTTPS.
Given below are a few checks you must do to get a sense of the overall security protocol of the website.
- Check the website’s homepage, category pages and product pages for HTTPS. Try accessing the website using the Non-Secure Protocol (HTTP) and check if it is getting redirected to the relevant HTTPS version of the website. The presence of the HTTP version of the websites can create mixed content issues like content duplication.
- You can use Google’s Lighthouse browser plugin to verify if HTTPS has been used across the website. With the plugin installed, click ‘Generate Report’. Once the report id is generated, check under Best Practices > Passed Audits
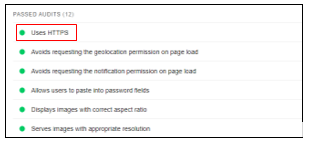
Source – Lighthouse
Refer the below mentioned link for more information about HTTPS
5. Scanning for Broken Links
To ensure that we cater relevant pages to the crawler and user, we need to check for pages displaying a 404-error status code (Page Not Found). Broken links on indexation can lead the users to an error page, thereby having a negative impact on user experience.
The Search Console ‘Coverage’ report can help you identify any error pages present on the website. On selecting ‘Errors’, one can scroll down and check for pages displaying a 404-status code.
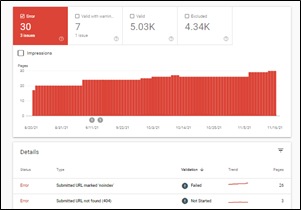
Source – Google Search Console
These pages can be redirected to other relevant pages within the website to ensure that we do not lose out on potential traffic.
6. Auditing Robots.txt file
A robots.txt file tells search engine crawlers which URLs the crawler can access on your site. It is mainly a directive to ensure that only relevant pages are presented to the crawler to ensure maximum coverage and avoid irrelevant indexing pages.
The robots.txt file can be accessed by typing in the below-mentioned URL
The most common directive to ensure that all the pages are accessible to the crawler is as given below.
User-Agent: *
Disallow:
Sitemap: https://abc.com/sitemap.xml
The asterisk symbol (*) denotes all user agents. Pages that need to be blocked can be added in the disallow directive. In contrast, the XML sitemap will present the crawler with all the website’s relevant pages, facilitating smooth crawling.
Refer to the below-mentioned link for more information about how robots.txt works
7. Auditing XML Sitemap
An XML Sitemap is a file that contains a list of all the crucial pages of the website to help Google find and index the same. The XML Sitemap can be accessed by typing in the below-mentioned URL
The exact URL of the XML sitemap can also be located in the robots.txt file.
One must ensure that the XML Sitemap only contains relevant URLs that you want to get indexed.
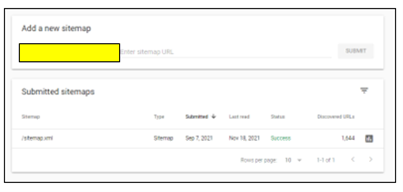
The XML Sitemap can also be added to Google Search Console by choosing the ‘Sitemap’ option under the ‘Index’ section to analyse if all the URLs present are valid and improve discoverability.
Refer the below mentioned link for more information about XML Sitemaps
8. Auditing HTML Sitemap
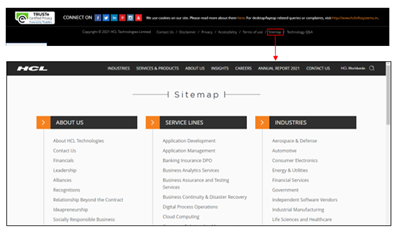
HTML Sitemap is an HTML file that contains all the website’s important pages and creates a general picture of the entire website. In simpler terms, XML Sitemap is for crawlers to understand the site structure, whereas an HTML Sitemap serves users with relevant pages of the website.
The HTML Sitemap is usually located at the website’s footer section, helping users understand the site hierarchy in detail, thereby facilitating smooth navigation.
Like XML Sitemap, one must ensure that only relevant pages are added in the HTML Sitemap.
9. Page Speed Checks
Page speed is a measurement of how fast the content on your page loads.
Page speed is often confused with “site speed,” which is the page speed for a sample of page views on a site. Page speed can be described in either “page load time” (the time it takes to display the content on a specific page fully) or “time to first byte” (how long it takes for your browser to receive the first byte of information from the webserver).
For both desktop and mobile search rankings, Google has announced that page speed is a ranking factor. Page speed also can poorly affect user experience, increase exits, and increase bounce rate.
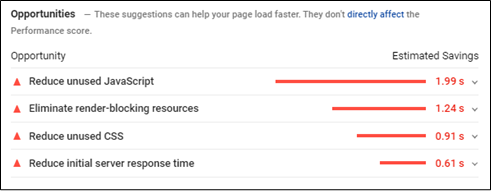
Go to the Google PageSpeed Insights tool and enter your site’s URL
The tool, in turn, will provide a score for your desktop and mobile version with specific recommendations to help improve the page score and eventually improve the website experience as well.
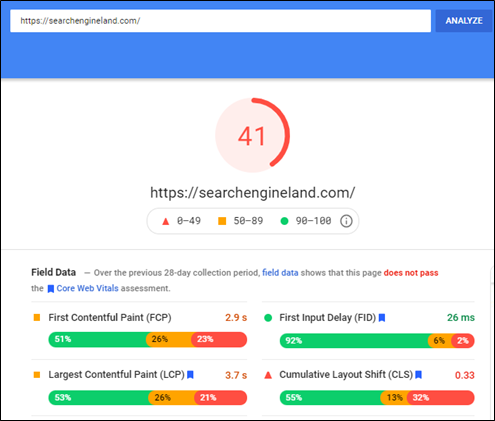
Core Web Vitals
Core Web Vitals are a set of specific factors that Google considers important in a webpage’s overall user experience. Core Web Vitals are made up of three specific page speed and user interaction measurements: LCP (Largest Contentful Paint), FID (First Input Delay), and CLS (Cumulative Layout Shift)
Since Google has made Core Web Vitals an important ranking factor, ensuring that the scores meet the guidelines set is vital.
Core Web Vitals can be checked using Google Search Console in the ‘Experience’ section.
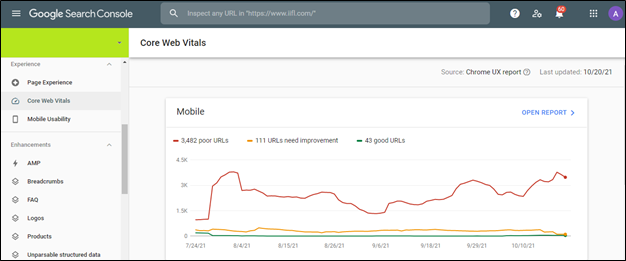
Core Web Vital scores for all URLs on Mobile and Desktop is given in the above dashboard. This makes it easier to identify and optimise the pages based on three vital parameters.
Refer to the below-mentioned link for more information about Google Search Console
- Mobile Checks
With the advent of mobile-first indexing and the increasing number of mobile phone users, it is imperative to ensure that the website is mobile-friendly for user experience, indexation and ranking purpose.
Mobile Optimization ensures that mobile visitors have an experience optimised for their device and considers factors such as website design, site structure, page speed and more to ensure a seamless and quality mobile experience.
Given below are a few vital mobile checks that you must do
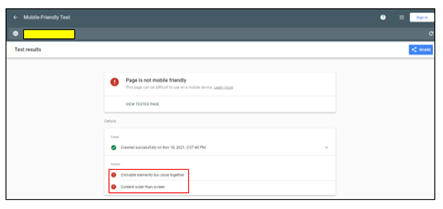
- Use the Mobile-Friendly Test Tool
The Google Mobile-Friendly Test is a free tool that allows you to type in the website URL and find out how mobile-friendly Google thinks their site is. It also gives specific recommendations concerning mobile checks, helping identify any issues (if any).
Content Mismatch
It is vital to ensure that the content present on the mobile device and desktop is the same. Keeping in mind the mobile-first approach taken by Google, if your mobile site has less content than your desktop version, Google might not get additional information about your website, thereby hampering the indexation and ranking of the website.
Although different designs can be adopted for the mobile version to maximise user experience (Creation of accordions and tabs to show content), the content present should be exactly like that of the desktop version
- Use Large Buttons
Mobile-friendly websites need to have call to action buttons that are large enough to induce users to tap them rather than zoom. This, in turn, makes it easier for the user to navigate and increases user-friendliness in the process.
Additionally, there needs to be spacing between hyperlinks. If links are placed too close to each other, users might attempt to click on a link and accidentally click on a different one, thereby hampering user experience in the process.
- Make the text large enough to read
The text on the website needs to be legible and large enough, thereby making it comfortable to read. Users should not have to zoom in and scroll left or right to read something as this might negatively affect user experience.
- Navigation Mismatch
The options present under the navigation in the mobile version should be similar to the desktop version to ensure accessibility. Missing options in the navigation menu can affect the website’s visibility, affect ranking, and hurt user-friendliness.
- Simplification of Navigation Menus
Since desktop website menus have a lot of space, they can take up the entire bar at the top of the screen with additional drop-down options without negatively impacting the user experience.
There isn’t much space to incorporate the menu like the desktop version with respect to mobile devices.
Mobile-friendly websites must use simple menus that are easy to use and present an accurate overview of the website. Users can then use categories, filters, or the search functionality to navigate further.
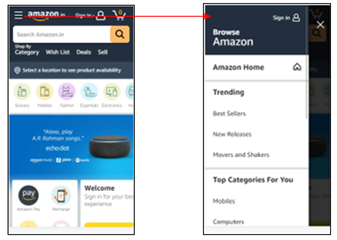
Most mobile-friendly websites use the hamburger menu. A hamburger menu, when clicked, opens to reveal a navigation menu, thereby not utilising a large amount of space.
- Avoid Pop-Ups and Intrusive Interstitials
In 2017, Google rolled out an algorithm change that penalizes websites that include specific types of pop-ups on mobile devices.
As stated by Google, the below mentioned pop-ups can have a negative effect on the website by making content less accessible.
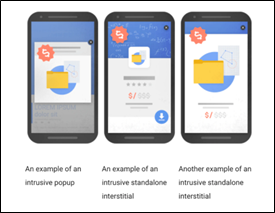
Source – (Reference Link)
As seen from the image, any pop-up or interstitial that makes it difficult to access the content is termed as intrusive and can lead to further penalties.
Given below are the pop-ups that are not deemed as intrusive thereby having no negative effect on the website
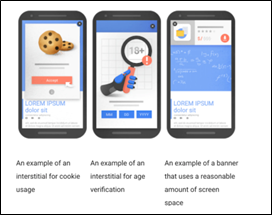
Source – (Reference Link)
As seen from the above image, pop-ups that do not take much space, add value to the user journey and cookie usage settings are not deemed as intrusive.
11. Auditing Backlinks
Backlink Audit is the process of analyzing links pointing your website. The process involves identifying good and bad backlinks and developing a robust strategy.
Backlinks for your website can be downloaded from Google Search Console by choosing the ‘Links’ option.
Backlinks can also be extracted by third party tools like Ahrefs and Majestic SEO.
Given below are few steps to understand how backlinks need to be audited
- Benchmark Your Backlink Profile Against Competitors
With the help of third-party tools, we can analyze the backlinks for our competitors to understand the quality for the same. This can help you create a robust link building strategy for your website.
- Find and Evaluate Each Backlink You Have
Backlink portfolio of the website needs to be analyzed in order to identify and remove irrelevant and spammy links pointing to your website.
Since, Google can penalize you for disavowing sites for no apparent reason, it is highly important to ensure that only spammy links are disavowed.
Irrelevant backlinks can be divided into two separate categories: Low Quality Links and Spammy Links.
In case of low-quality links, one can reach out to the site owner to get the link removed from their end. Whereas in case of Spammy links (Porn Sites, Casino Sites etc.) , they can be removed by submitting a list of URLs in Disavow Links (Reference Link)
- Domain Authority (DA) Bifurcation of website
Domain Authority of a website describes its relevance for a specific subject area or industry. The domain authority score helps us understand the authority of the website for that industry.
Getting backlinks from high domain authority will not only help solidify our backlink portfolio but also help increase our domain authority in the process.
- Anchor text diversification
Anchor texts are the visible, clickable words used to link one page to another. Anchor texts can have a major influence on rankings in the search engine result pages since the crawler gets more information about your brand and product offering through the anchor text. As a result of which, it is highly important to ensure that we do not overuse terms like click here, learn more etc. Anchor texts should have a healthy mix of brand terms and relevant non brand terms to ensure relevancy and visibility.
12. Analytics Set Up
If Google Analytics is already set up, ensure that it is set up and working properly to get accurate data.
Checks that can be done to ensure proper set up
- Source Code
Check your source code (Ctrl+U) of the Home Page, main category pages, and product pages for the presence of the tracking code associated with your Analytics account and property. Since some Content Management Systems handle page templates differently, it’s a good idea to check each kind to make sure tracking is consistent.
The code should be installed in the head tags (between <head> and </head>) and usually includes an ID that you can match with your Analytics property/view.
- Google Tag Assistant
Google’s Tag Assistant browser plugin can help verify if the tracking code is installed correctly.
- Analyze the Google Analytics Traffic
If you see extreme shifts in data, then it could be an indication that the tracking code present is not firing properly when loaded.
In your Google Analytics data, look for periods with no sessions, sudden change in traffic and very high/low bounce rate. These can be symptoms of potential tracking code issues
13. Accessing Google Search Console
Search Console is a free tool from Google that helps developers, website owners, and SEO professionals understand how their site is performing on Google Search.
Search Console allows you to check indexing status and optimize visibility for the website. It also allows you to check for pages displaying server error, manual actions, page experience, core web vitals to help identify issues within the website.
Refer the below mentioned link for more information about Google Search Console